

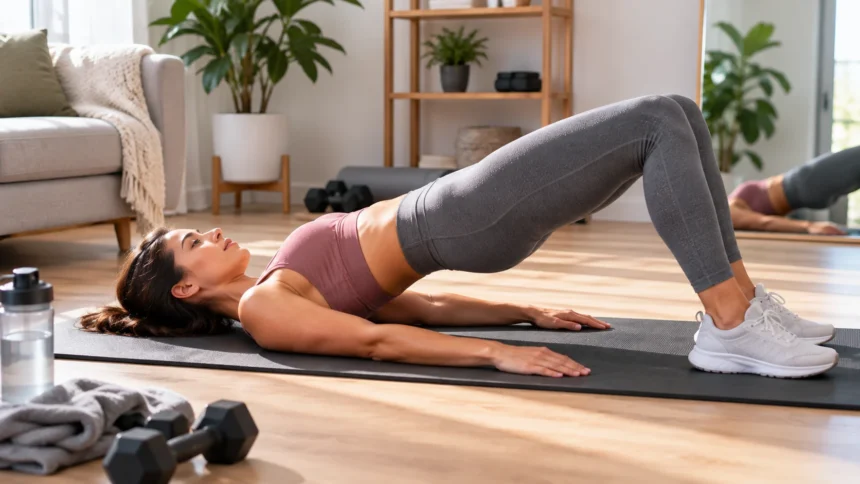
Glute Bridge: Benefits, Muscles Worked & Proper Form
The glute bridge is a simple lower-body exercise that can build stronger glutes, improve hip-extension strength, and teach better control of the pelvis and trunk. It requires very little space and the basic version needs no equipment, making it accessible for home workouts, gym sessions, warm-ups, and beginner strength programs. Despite its simplicity, performing the movement correctly matters because poor technique can shift unnecessary effort toward the lower back or hamstrings. The goal is not simply to lift the hips as high as possible. Instead, the exercise should be driven primarily by the glute muscles while the trunk remains controlled. Once basic form feels comfortable, resistance bands, weights, pauses, marches, and single-leg variations can make the exercise progressively more challenging.
The glute bridge primarily trains the gluteus maximus, the large muscle responsible for much of the hip extension used during walking, running, climbing, jumping, and strength exercises. The hamstrings and several muscles around the trunk and hips also contribute to the movement and help stabilize the pelvis. Because the exercise is performed on the floor, it provides a relatively stable environment for learning how to extend the hips without requiring complex balance or equipment. This makes it useful for beginners who are developing body awareness as well as experienced lifters using bridges as an accessory exercise. However, the glute bridge is not automatically the best exercise for every goal. Exercise selection should reflect training experience, mobility, available equipment, and individual comfort.
Understanding proper glute bridge form can make the exercise significantly more effective. Foot position, pelvic control, breathing, range of motion, and the speed of each repetition all influence where tension is felt. A strong repetition finishes when the hips are extended and the body forms a controlled line from the shoulders through the hips toward the knees, not when the lower back has been forced into a large arch. This guide explains the glute bridge benefits, muscles worked, correct technique, common mistakes, variations, and differences between a glute bridge and hip thrust. It also covers how many repetitions to perform, how to make bridges harder, and when discomfort may be a sign to modify or stop the exercise.
What Is a Glute Bridge?
A glute bridge is a hip-extension exercise performed while lying on your back with your knees bent and feet planted on the floor. From this starting position, you contract the glutes and raise your hips until your trunk and thighs form a controlled diagonal line. The hips are then lowered toward the floor before the next repetition begins. Because the shoulders remain supported by the floor, the movement is generally easier to learn than many standing lower-body exercises. The basic version uses body weight, although additional resistance can eventually be placed across the hips. Its combination of simplicity and adaptability makes the bridge common in strength training, general fitness, warm-up routines, and some rehabilitation programs.
The main movement occurring during a glute bridge is hip extension. Hip extension means increasing the angle at the front of the hips, such as when you stand upright after bending forward or drive your leg backward during walking and running. The gluteus maximus is particularly important for producing this movement, which explains why bridges are widely used as a glute exercise. Your hamstrings and other muscles also contribute, while abdominal and spinal muscles help keep the trunk controlled. The exercise therefore involves more than squeezing one isolated muscle. A well-performed bridge coordinates the hips, pelvis, legs, and trunk so force is produced without relying excessively on movement from the lumbar spine.
The glute bridge is often described as a beginner exercise, but that description does not mean it becomes useless once someone grows stronger. Beginners can use the bodyweight version to learn hip-extension mechanics, while experienced exercisers can add substantial resistance or more demanding variations. A pause at the top can increase time under tension, and resistance bands can challenge hip control in different ways. Single-leg bridges greatly increase the stability requirement and load placed on one side. Weighted bridges can also be included as accessory work after squats or deadlifts. The exercise can therefore progress from an introductory bodyweight movement into a meaningful part of a broader strength program.
Glute bridges are also frequently used during warm-ups because they can help a person practice contracting the glutes before performing larger compound movements. A few controlled sets may help establish awareness of hip extension before squats, deadlifts, lunges, running drills, or other lower-body exercises. However, the idea of glute “activation” should not be interpreted as though healthy glutes are normally switched completely off. The exercise is better viewed as an opportunity to rehearse muscle recruitment and movement control. Warm-up sets should therefore remain controlled rather than becoming a fatiguing workout. The objective is to prepare the movement pattern without exhausting muscles that will be needed during heavier exercises afterward.
The floor-based position also makes the glute bridge useful when someone wants an exercise with relatively low coordination demands. Unlike a squat or lunge, it does not require balancing the body vertically while several joints move through large ranges. This can make it easier to focus specifically on hip extension and glute contraction. Still, simple does not mean automatically appropriate for everyone. People with recent injuries, significant back or hip pain, surgical restrictions, or other medical concerns may need individualized exercise guidance. If a bridge causes sharp pain, increasing numbness, or symptoms radiating through the leg, forcing additional repetitions is not a productive training strategy. Exercise should create muscular effort, not concerning pain.
What Muscles Do Glute Bridges Work?
The gluteus maximus is the primary muscle targeted during a standard glute bridge. It is the largest of the three main gluteal muscles and plays a major role in extending the hip. When you push the hips upward from the floor, the gluteus maximus shortens to help move the pelvis relative to the thighs. Strong hip-extension ability contributes to many everyday and athletic movements, including standing from a seated position, climbing stairs, accelerating during running, and lifting objects. The gluteus maximus is also heavily involved in exercises such as deadlifts, squats, step-ups, and hip thrusts. Performing bridges with deliberate glute contraction can therefore strengthen a movement pattern that appears throughout lower-body training.
The hamstrings also contribute to the glute bridge because they cross the hip joint and assist with hip extension. These muscles run along the back of the thigh and include the biceps femoris, semitendinosus, and semimembranosus. Some people feel bridges almost entirely in their hamstrings, particularly when their foot position or technique reduces effective glute contribution. This does not mean hamstring involvement is wrong because they are supposed to help. However, repeated hamstring cramping or an inability to feel the glutes working may suggest that foot position, pelvic control, or exercise difficulty needs adjustment. Moving the feet slightly closer or farther away can substantially change how the movement feels.
The muscles around the trunk also work during a glute bridge even though the exercise does not resemble a traditional abdominal exercise. Abdominal muscles help control the rib cage and pelvis so the hips can extend without excessive arching through the lower back. The erector spinae and other muscles surrounding the spine also contribute to maintaining a stable trunk during the movement. This coordinated activity is why bridges are sometimes included in programs designed to develop lumbopelvic control. The objective is not to rigidly flatten the spine against the floor throughout every repetition. Instead, the trunk should remain controlled while the majority of visible motion comes from the hips rather than an exaggerated lumbar extension.
The gluteus medius and gluteus minimus are smaller gluteal muscles that contribute substantially to pelvic stability and control of the thigh. Their role becomes especially noticeable during single-leg or banded bridge variations where the body must resist unwanted rotation or inward movement of the knees. In a standard bilateral bridge, the gluteus maximus remains the major hip-extension muscle, while the surrounding hip musculature assists with maintaining alignment. Placing a resistance band around the thighs can increase the demand to keep the knees aligned instead of allowing them to collapse inward. However, pushing the knees excessively outward is not necessary. The aim is controlled alignment rather than creating movement simply to feel additional muscle tension.
Adductors and other muscles around the hips and thighs may also contribute as stabilizers during the exercise. The exact distribution of muscular effort changes with foot width, foot distance, resistance, range of motion, and whether one or two legs are used. This is why two people can perform visually similar bridges yet feel the exercise differently. Anatomy, mobility, previous training, and technique influence which muscles fatigue first. Rather than expecting one highly specific sensation, focus on controlled hip extension without pain or compensation. Feeling the glutes work is useful feedback, but soreness or an intense burning sensation is not required for an exercise to be effective. Training progress should ultimately be judged by improving strength, control, and exercise performance over time.
Benefits of Glute Bridges for Strength and Movement
One of the main glute bridge benefits is developing strength in the gluteus maximus without requiring a complicated setup. Strong glutes contribute to hip extension during standing, walking, running, stair climbing, and many athletic movements. They also contribute to compound exercises such as squats and deadlifts, making direct glute training useful for people pursuing broader lower-body strength. Beginners can initially gain strength using body weight because the movement itself may provide sufficient challenge. As adaptation occurs, adding resistance prevents the exercise from becoming too easy. The ability to progress gradually makes the bridge suitable for different stages of training rather than limiting it to one fitness level.
Glute bridges can also improve awareness and control of hip extension. Some exercisers unintentionally produce a large amount of movement from the lower back when asked to extend their hips, particularly when they are unfamiliar with the movement pattern. Because the bridge provides support from the floor, it gives people an opportunity to practice moving the hips while controlling the rib cage and pelvis. This skill can carry over conceptually to deadlifts, squats, kettlebell swings, step-ups, and other exercises requiring coordinated hip movement. Transfer is not automatic, so those movements still need to be practiced individually. Nevertheless, learning to recognize the difference between hip extension and simply arching the back can improve exercise technique.
Another advantage is accessibility. The basic bodyweight glute bridge requires no machine, barbell, bench, or specialized piece of fitness equipment. Someone can perform it in a bedroom, hotel room, gym, studio, or other space with enough room to lie down comfortably. This makes bridges convenient for home training programs and travel workouts where equipment may be limited. They can also be modified easily by changing repetitions, tempo, pauses, or the number of legs used. Equipment such as mini bands and dumbbells can be added later without requiring a complete change in technique. Exercises that are easy to set up are often easier to perform consistently, which can matter more than choosing unnecessarily complicated alternatives.
Bridges can be useful as an accessory exercise when someone wants additional glute training without adding another technically demanding compound lift. Heavy squats, deadlifts, and lunges can require substantial effort from several muscle groups as well as significant concentration. A bridge allows targeted hip-extension work in a more stable position and can therefore fit well toward the beginning or end of a lower-body session depending on its purpose. Light bridges may be used during a warm-up, while challenging weighted variations can become working sets. The correct placement depends on whether the goal is preparation, muscle development, strength, or movement practice. Using the same bridge prescription for every goal is less useful than adjusting it to the program.
Glute strengthening may also form one part of exercise programs designed to improve overall hip and trunk function, but bridges should not be presented as a universal treatment for back, knee, or hip pain. Pain has many possible causes, and strengthening one muscle group does not address every condition. Some people may benefit from bridges as part of a program developed by a physical therapist or other qualified professional, while others may need different exercises. Claims that weak glutes are responsible for every lower-body problem oversimplify human movement. A more realistic benefit is that glute bridges provide a scalable way to strengthen hip-extension musculature. Whether that translates into symptom improvement depends on the individual and the wider rehabilitation or training plan.
How to Do a Glute Bridge With Proper Form
Begin a basic glute bridge by lying comfortably on your back on a stable exercise surface. Bend both knees and place your feet flat on the floor approximately hip-width apart. Your arms can rest beside your body with the shoulders relaxed, and your head should remain comfortably supported rather than lifting toward the chest. Position the feet at a distance where your knees are comfortably bent and your heels remain securely planted. There is no universal measurement that fits every person’s leg length, so small adjustments are normal. Before moving, become aware of your rib cage and pelvis so you can maintain a controlled trunk rather than beginning the repetition with an exaggerated arch in your lower back.
Prepare for the lift by lightly bracing your abdominal muscles and contracting the glutes. Think about keeping the ribs organized over the pelvis rather than flaring them upward as the hips rise. Press your feet firmly into the floor and begin extending your hips in one smooth motion. The knees should generally track in the same direction as the toes instead of collapsing dramatically inward or spreading excessively outward. Continue lifting until your hips are fully extended for your comfortable range. At the top, your body should create a controlled diagonal line from your shoulders through your hips toward your knees without requiring you to push the abdomen unnecessarily high.
Pause briefly at the top and squeeze the glutes while continuing to breathe. A one- or two-second pause can help beginners recognize the finished position and prevent the exercise from becoming a rapid bouncing motion. Do not attempt to create additional height by aggressively arching the lower back after the hips have already reached extension. More height does not automatically mean more glute work. The correct end point is where the hips are extended and the trunk remains controlled. If you feel primarily compression in your lower back instead of muscular effort around the glutes, lower the hips slightly and focus on maintaining better rib and pelvic control during the next repetition.
Lower the hips back toward the floor slowly rather than dropping them without control. The eccentric, or lowering, portion of the movement still places tension on the muscles and should be treated as part of the repetition. Depending on the purpose of the set, you can lightly touch the floor before beginning another repetition or stop just above it to maintain continuous tension. Neither option is universally superior. Beginners often benefit from resetting briefly between repetitions so they can maintain consistent form. More experienced exercisers may use continuous tension when pursuing muscular endurance or hypertrophy. Whatever variation you choose, the hips should move smoothly and the body should not rock from side to side.
Breathing should remain natural throughout the exercise. A simple approach is to exhale during the lifting portion and inhale while lowering, although more experienced lifters may use different breathing strategies when handling heavier resistance. Avoid holding your breath unnecessarily during easy bodyweight repetitions. Your neck, jaw, and shoulders should remain relatively relaxed rather than tensing every part of the body. Most effort should be noticeable around the hips, glutes, and supporting muscles of the trunk and legs. Perform the movement slowly enough that you can recognize when technique begins to change. Quality repetitions are usually more valuable than rushing to complete a predetermined number after muscle fatigue has already caused the lower back or hamstrings to dominate.
Common Glute Bridge Mistakes and How to Fix Them
Excessively arching the lower back is one of the most common glute bridge mistakes. This usually occurs when someone focuses on getting the hips as high as possible instead of finishing the repetition through controlled hip extension. At the top of the bridge, the rib cage may flare upward and the abdomen may project toward the ceiling as the lumbar spine extends. This position can shift the sensation away from the glutes and create unnecessary discomfort in the lower back for some people. To correct it, think about gently keeping the ribs down while squeezing the glutes. Stop the upward movement when the hips are extended rather than continuing until no additional height is physically possible.
Foot position can also cause problems. Placing the feet very far from the body may increase the demand on the hamstrings and can cause some people to cramp during the movement. Bringing the heels extremely close may feel uncomfortable at the knees or reduce the natural range for some body proportions. Start with a comfortable knee bend and adjust the feet slightly until the glutes and hamstrings can work without cramping or joint discomfort. Both feet should stay planted throughout the repetition unless you are intentionally performing a heel-elevated or another specialized variation. There is no need to force all pressure through only the heels while lifting the toes completely off the ground.
Allowing the knees to collapse inward is another technique issue, especially when fatigue increases. Ideally, the thighs should remain reasonably aligned with the feet as the hips rise and lower. If the knees repeatedly move toward each other, reducing the resistance or slowing down the exercise may help restore control. A light resistance band placed above the knees can sometimes provide useful feedback by encouraging the exerciser to maintain gentle outward tension. However, pushing hard against the band until the knees move far outside the feet creates a different compensation. The goal is stable alignment through the hips and knees, not maximizing how far apart the thighs can spread during each repetition.
Moving too quickly can reduce control and make it harder to notice which muscles are doing the work. Some people bounce their hips off the floor and use momentum to complete large numbers of repetitions. Although high-repetition bridges can have a place in training, speed should not replace muscular control. Try taking one or two seconds to raise the hips, pausing briefly, and then lowering with similar control. This creates a clearer opportunity to feel the top position and maintain alignment. If the movement becomes dramatically faster near the end of the set, fatigue may already be affecting technique. Ending the set with a few repetitions still available can be more productive than forcing sloppy repetitions simply to reach a round number.
Progressing too quickly is another common mistake. Someone may move immediately from an easy bodyweight bridge to a heavily weighted version or unstable single-leg variation before controlling the basic movement. Additional resistance magnifies technical problems rather than automatically correcting them. Progress first by improving consistency, range of motion, tempo, and the ability to keep the pelvis level. You can then add pauses, bands, external resistance, or single-leg variations gradually. Progression should make an exercise more challenging while preserving its intended movement pattern. If a harder variation causes twisting, back discomfort, loss of control, or dramatically reduced range, returning temporarily to an easier version is a sensible training decision rather than a sign of failure.
Glute Bridge vs Hip Thrust: What Is the Difference?
The glute bridge and hip thrust are both hip-extension exercises that strongly involve the gluteus maximus, which is why their names are sometimes used interchangeably. The main difference is the position of the upper body. During a glute bridge, the shoulders and upper back remain on the floor throughout the exercise. During a typical hip thrust, the upper back is supported on a bench or elevated surface while the hips move through a larger vertical range. This change in setup can increase the available hip range of motion and makes loading the exercise with a barbell or other resistance more practical. Both movements can be effective, but their setup and progression options are different.
The floor glute bridge is usually easier to learn because the ground provides a broad and stable support surface. There is no need to position a bench correctly or balance the upper torso against an elevated edge. Beginners can therefore focus on learning to extend the hips and control the pelvis without managing as many setup variables. The bridge also works well in home workouts where a suitable bench is unavailable. Its limitation is that the floor stops the hips from moving below the level of the shoulders, creating a smaller overall range than a conventional hip thrust. This does not make the bridge ineffective, but it can influence how easily the exercise can continue progressing.
Hip thrusts are particularly useful when the goal is loading hip extension more heavily. A sturdy bench and appropriate equipment allow the exerciser to place substantial resistance across the hips while maintaining a predictable movement pattern. For people focused on glute strength or muscle growth, hip thrusts can therefore provide a convenient path to progressive overload. However, more weight does not automatically make them superior for every person. Heavy hip thrusts require setup time, appropriate equipment, padding, and confidence handling resistance. A bodyweight or weighted bridge may be entirely appropriate for someone who wants general strength, home exercise, or a simpler accessory movement without the logistical requirements of a barbell setup.
The two exercises can also coexist within the same training program rather than competing for one permanent position. A person might use bodyweight bridges during a warm-up and perform heavier hip thrusts as a primary glute exercise later in the session. Another person could perform weighted floor bridges when the gym is crowded or no bench is available. Single-leg bridges might be selected for unilateral control while bilateral hip thrusts provide heavier loading. Exercise choice should reflect the purpose of the training session rather than social-media debates about which movement is universally better. Both are variations of hip extension, and their usefulness depends on how they are programmed, progressed, and performed.
Comfort can also influence the decision. Some people dislike placing their upper back against a bench or find heavily loaded hip thrusts uncomfortable around the hips despite padding. Others prefer the increased range of the hip thrust and feel limited by the floor during bridges. Individuals with specific injuries or mobility restrictions may also tolerate one version better than the other. There is no requirement to perform an exercise that consistently causes pain simply because it is popular. A well-designed training plan usually provides multiple ways to strengthen the same movement pattern. The best choice is an exercise that can be performed comfortably, progressively, and consistently while matching the person’s goals and available equipment.
Glute Bridge Variations and Progressions
The paused glute bridge is one of the simplest ways to increase difficulty without adding equipment. Perform the standard bridge, but hold the top position for several seconds while maintaining glute tension and controlled breathing. The pause removes some of the tendency to rely on momentum and increases the amount of time the muscles remain under tension. Beginners can start with short pauses and gradually increase their duration. Another option is slowing the entire repetition, taking several seconds to lift and lower the hips. Tempo changes can make a familiar bodyweight exercise significantly more demanding. They are particularly useful when traveling or training at home where adding external resistance is not practical.
A banded glute bridge adds resistance around the thighs, usually just above the knees. The exerciser maintains gentle outward pressure against the band while continuing to perform hip extension. This increases the demand on muscles involved in controlling the position of the thighs and pelvis. The band should not cause the knees to flare excessively outward or change the bridge into an entirely different movement. Start with light resistance because very strong bands can make maintaining normal alignment unnecessarily difficult. Banded bridges can work well during warm-ups or accessory training and are easy to perform with minimal equipment. However, a band is not required for effective glute training if a standard bridge already provides sufficient challenge.
A weighted glute bridge is a straightforward progression when bodyweight repetitions become easy. A dumbbell, kettlebell, weight plate, or suitably positioned barbell can provide additional resistance across the hips. Padding may improve comfort when using hard equipment, and the weight should remain stable throughout the movement. Start conservatively so you can determine whether the added resistance changes your ability to control the pelvis and lower back. The objective is still hip extension rather than moving the largest possible load by any available method. Increase resistance gradually once you can complete the chosen repetition range with consistent technique. This creates progressive overload without requiring an immediate transition to a more complex exercise.
The bridge march introduces an additional stability challenge. Begin by lifting into a normal bridge and holding the pelvis level. While maintaining the elevated position, slowly lift one foot a short distance from the floor and replace it before repeating on the other side. The challenge is preventing the pelvis from dropping or rotating as body weight shifts onto one leg. This variation increases the demand on trunk and hip stabilizers without requiring a full single-leg bridge immediately. Move slowly because fast alternating steps can hide poor control. If the hips shift substantially every time a foot leaves the ground, return to a bilateral bridge or shorten the marching movement until stability improves.
The single-leg glute bridge is a more advanced progression because one leg must produce much more of the hip-extension force while the pelvis remains controlled. Begin in the usual bridge position, lift or extend one leg according to the variation being used, and raise the hips using the planted leg. Keep the pelvis as level as possible rather than rotating toward the unsupported side. Single-leg bridges can become demanding quickly, so fewer high-quality repetitions may be more appropriate than large sets. They are not automatically better than bilateral weighted bridges because they train the movement differently. Use them when unilateral strength or control fits the program, and return to an easier version if hamstring cramping or pelvic rotation prevents good technique.
How to Add Glute Bridges to Your Workout
The appropriate number of glute bridge repetitions depends on the purpose of the exercise. Someone learning the movement might begin with two or three sets of approximately eight to fifteen controlled repetitions. Higher repetitions can work for endurance or light activation, while heavier resistance usually makes moderate or lower repetition ranges more practical. There is no special number that produces glute development for everyone. The final repetitions should feel challenging enough to create a training stimulus while still allowing good technique. If you can perform dozens of bodyweight repetitions without meaningful effort, increasing resistance or choosing a harder variation will usually be more efficient than endlessly adding repetitions.
When bridges are used as part of a warm-up, the objective should be preparation rather than fatigue. One or two light sets can be enough to rehearse hip extension and establish awareness of the glutes before more demanding lower-body training. Performing several exhausting sets before heavy squats or deadlifts could reduce performance instead of improving it. Keep the repetitions controlled and stop well before muscular failure. You can combine bridges with other warm-up movements that prepare the hips, knees, ankles, and trunk for the session ahead. A warm-up should relate to the activities you are about to perform rather than becoming a separate workout that consumes most of your energy.
For strength or muscle-building goals, glute bridges can be programmed as a working exercise with progressive resistance. Keep track of the weight, repetitions, sets, and variation so progress can be measured instead of relying only on how much the glutes burn. Once you reach the upper end of your intended repetition range with good technique, a modest increase in resistance can provide a new challenge. The bridge can be performed before or after other lower-body exercises depending on its importance within the program. If glute strength is a major priority, performing the most important hip-extension exercise earlier may make sense. If bridges are supplementary work, placing them later in the session may be more practical.
Training frequency also depends on total workload rather than on the bridge alone. The glutes may already receive significant training from squats, deadlifts, lunges, step-ups, running, and other activities. Adding bridge sessions every day without considering those exercises can create unnecessary fatigue. Many people can train the glutes several times per week when volume and intensity are distributed appropriately, but recovery needs vary. Muscle soreness is not a perfect indicator of whether another session is appropriate. Performance, sleep, training experience, overall workload, and how the body feels should all influence programming. Beginners usually benefit from starting with manageable volumes and increasing gradually rather than attempting an advanced high-frequency routine immediately.
People using glute bridges because of pain, injury recovery, pregnancy, postpartum changes, or a diagnosed musculoskeletal condition should consider individualized guidance. An exercise that is appropriate for general fitness may need modification in a rehabilitation program. Sharp back pain, hip pain, worsening nerve symptoms, unusual weakness, or pain that continues after stopping the movement warrants more attention than ordinary muscle fatigue. A physical therapist or another qualified healthcare professional can determine whether bridges fit the specific condition and show appropriate progressions. For otherwise healthy exercisers, the basic principle remains simple: choose a variation that can be controlled, progress it gradually, and combine it with a balanced program rather than expecting one exercise to provide every lower-body benefit.
Frequently Asked Questions About Glute Bridges
What muscles do glute bridges work?
Glute bridges primarily work the gluteus maximus, with the hamstrings, spinal stabilizers, abdominal muscles, and other muscles around the hips contributing to the movement. The stabilizing demand can increase with banded, marching, or single-leg variations.
How many glute bridges should I do?
Beginners can often start with two or three sets of roughly 8–15 controlled repetitions and adjust according to ability and goals. When high repetitions become very easy, adding resistance or progressing the variation is usually more useful than continually increasing the rep count.
Are glute bridges good for building glutes?
Yes, glute bridges can strengthen and develop the glutes when they provide sufficient resistance and are progressively made more challenging. For continued muscle growth, bodyweight bridges may eventually need to progress to weighted bridges, hip thrusts, or other challenging glute exercises.
What is the difference between a glute bridge and a hip thrust?
A glute bridge is performed with the shoulders on the floor, while a hip thrust normally places the upper back on an elevated bench. Hip thrusts generally provide a larger range of hip motion and are often easier to load heavily, whereas bridges require less equipment and have a simpler setup.
Why do I feel glute bridges in my hamstrings?
The hamstrings naturally assist with hip extension, so some hamstring involvement is normal. If they repeatedly cramp or dominate the exercise, experiment with foot position, reduce the difficulty, slow the movement, and focus on controlled glute contraction without excessively arching the lower back.